If you want to know how to remove calcium from pool tiles without damaging the finish, first separate light waterline residue from thick, bonded mineral scale. The cleaning method should follow the tile material, grout condition, and water balance rather than the strength of a chemical or abrasive.
Table of Contents
- Identify Calcium Scale vs. Other Pool Tile Stains
- What You’ll Need to Remove Calcium From Pool Tiles
- Optional tools for stubborn deposits:
- How to Clean Pool Tile Without Draining
- Pool Scale Removal Methods for Heavy Buildup
- Professional Pool Tile Cleaning: When to Call an Expert
- Prevent Calcium Buildup Through Water Chemistry
- Common Mistakes to Avoid When Removing Calcium Deposits
- Frequently Asked Questions
Last Updated: October 8, 2026
Identify Calcium Scale vs. Other Pool Tile Stains
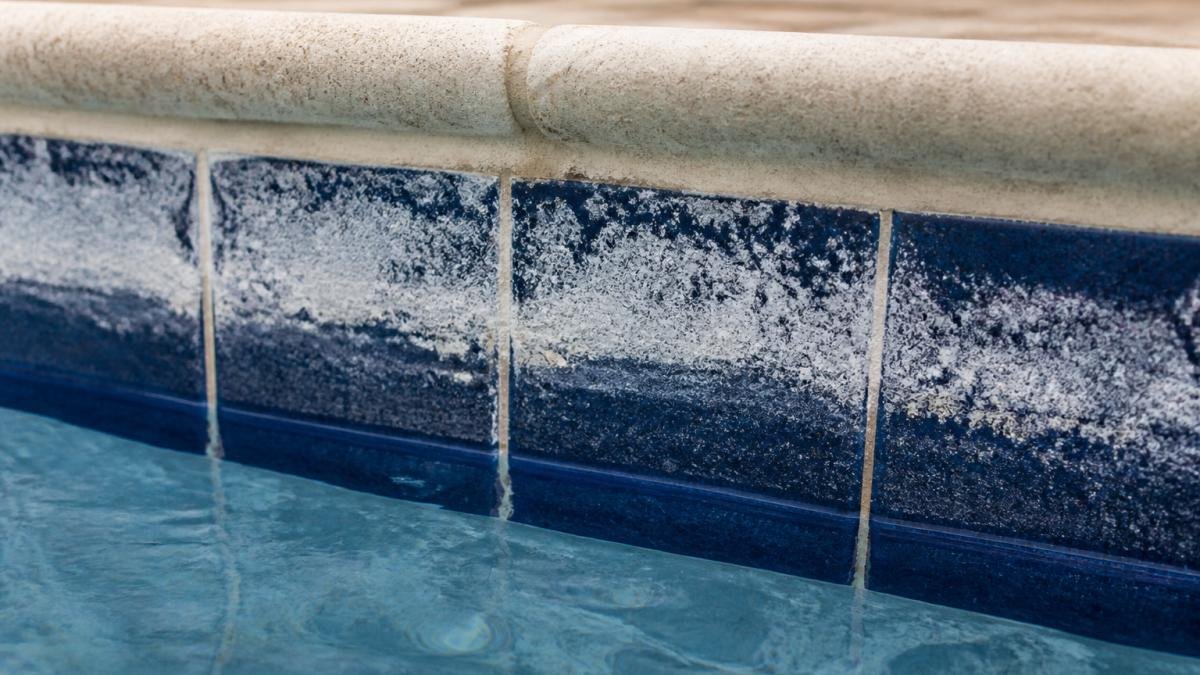
Other stains look different: algae is green, yellow, or brown; rust is orange or reddish; mold is black or dark green. Calcium scale is always white or light gray.
To be sure, scrape the tile gently with a coin. Calcium flakes off easily; other stains don’t.
Calcium deposits form when hard water minerals sit on tile, dry, and bond to the surface in layers.
The good news: calcium is easier to remove than most stains.
Pro Tip: Check your pool tile weekly during dry months. Calcium deposits grow fastest when water evaporates quickly. Catching them early makes removal much easier.
What You’ll Need to Remove Calcium From Pool Tiles
Basic supplies for light calcium buildup:
- Soft-bristled brush or pool brush
- White vinegar or a commercial descaler
- Spray bottle, bucket of water
For heavy calcium buildup:
- Stiff-bristled brush or wire brush
- Pumice stone or abrasive pad
- Acid-based pool cleaner (muriatic acid or commercial equivalent)
Optional tools for stubborn deposits:
- Pressure washer (low pressure only)
- Soft cloth for polishing
Always wear protective equipment with chemical cleaners. Acid-based products can burn skin and damage eyes. Work in a well-ventilated area and never mix cleaners.
Video reference: How to Remove Calcium Scale on Your Pool (White, Chalky Calcium Deposits)
Watch Out: Muriatic acid is caustic. One splash can cause serious burns. Always add acid to water, never water to acid. Wear gloves, eye protection, and a respirator. If you’re uncomfortable with chemicals, hire a professional.
How to Clean Pool Tile Without Draining
You can learn how to remove calcium from pool tiles without draining your pool. This works for light to moderate buildup.
Step 1: Test Your Cleaning Method on a Hidden Area
Always test first on a small, hidden area: apply your cleaner, scrub gently, wait 5 minutes, and rinse thoroughly. Check for discoloration, pitting, or cracks. If the tile looks fine, proceed.
Tile materials respond differently to chemicals: ceramic is durable, natural stone is softer and acid-damaged, porcelain is very hard.
Step 2: Apply Your Chosen Cleaner and Let It Work
For light deposits, spray white vinegar on the calcium and let it sit 10-15 minutes to soften the mineral layer.
For heavy deposits, use a commercial descaler or diluted muriatic acid, following product instructions exactly. Most work best left on 15-30 minutes.
Don’t let the cleaner dry on the tile. Keep it wet and reapply if needed.
Timing guide for different cleaners:
- White vinegar: 10-15 minutes
- Commercial descaler: 15-30 minutes (check label)
- Diluted muriatic acid: 15-20 minutes (follow product instructions)
Step 3: Scrub and Rinse Thoroughly
Use a soft brush for light deposits and a stiff brush for heavy buildup. Scrub in circular motions, but don’t scrub too hard, you want to remove calcium, not damage the tile.
Rinse immediately and repeatedly with fresh water after scrubbing, leftover acid keeps eating the tile surface. Pour until the water runs clear, then dry with a clean cloth.
Key Takeaway: The key to safe cleaning without draining is working in small sections and rinsing thoroughly after each step. Never let acid sit overnight or dry on tile.
Pool Scale Removal Methods for Heavy Buildup
Heavy calcium deposits need stronger methods, but the right one depends on scale thickness and tile material. Get those wrong and you can etch glass tile, pit natural stone, or blow out grout.
Match the Method to Your Tile Material
Not all pool tile tolerates acid or abrasion equally. Identify your tile before picking a method:
- Ceramic (glazed): The most forgiving. Handles diluted acid, pumice stones, and light abrasive blasting. Avoid chipping the glaze with metal scrapers.
- Porcelain: Dense and hard. Tolerates acid and stiff brushes well. Avoid high-pressure washing above 1,500 PSI, which can crack the tile body.
- Glass tile: Acid is generally safe, but abrasives are not. Pumice, sandblasting, and wire brushes scratch the surface permanently. Stick to chemical descalers and soft brushes.
If unsure what your tile is, test a hidden area: a drop of white vinegar will tell you in 60 seconds, if the surface dulls or fizzes, it is acid-sensitive.
Acidic Cleaners and Descalers
Commercial descalers dissolve calcium carbonate without attacking most glazed tile. They are safer than muriatic acid, produce fewer fumes, and work best on scale under about one-quarter inch thick.
Typical application sequence:
- Wet the tile with clean water first so the cleaner does not soak unevenly.
- Apply descaler by spray or brush. Work in sections no larger than 4 to 6 feet so nothing dries.
- Let it dwell 15 to 30 minutes, reapplying if the surface starts to dry.
- Agitate with a stiff nylon brush (not wire) using circular motions.
- Rinse with fresh water until runoff runs clear, then rinse once more.
Diluted muriatic acid is more aggressive. A common pool-industry dilution is one part acid to ten parts water, but always follow the label. The rule that never changes: add acid to water, never water to acid.
Watch Out: Muriatic acid releases fumes that irritate lungs and eyes even outdoors. Wear chemical splash goggles, acid-resistant gloves, and a respirator rated for acid gas. Never mix acid with chlorine, bleach, or ammonia. Keep the pool pump off while you work so runoff does not enter the pool water, and cover nearby skimmer openings.
Wet Blasting (Media Blasting) for Stubborn Deposits
Wet blasting, also called media blasting or vapor blasting, mixes pressurized water with a fine abrasive to shear calcium off tile. It removes thick scale chemicals cannot touch and produces far less dust than dry sandblasting.
Abrasive choice matters as much as the equipment:
- Crushed glass or garnet: Aggressive. Best for ceramic and porcelain with thick scale.
- Glass bead: Gentler. Suitable for glass tile and some natural stone.
- Walnut shell or corn cob: Softest. Used on delicate stone and historic tile.
A wet blasting setup requires a compressor with sustained CFM, a blast pot or kit, a pressure-rated hose, and a full face shield plus respirator.
Pressure Washing on a Drained Pool
Draining the pool is a last resort. It exposes the entire tile line, allows stronger cleaners, and reaches scale above the normal waterline, but risks the pool shell if groundwater is high or the finish dries out.
If you drain:
- Use low pressure only. Start at 500 PSI and never exceed 1,500 PSI on tile.
- Keep the nozzle at least 6 to 12 inches from the surface and moving constantly.
- Combine with a descaler: spray, dwell 15 minutes, then wash gently.
Best For: Match the method to the tile, not just the scale. Glazed ceramic and porcelain tolerate descalers, pumice, and media blasting. Glass tile and grout require material-specific cleaning advice; avoid acid and abrasives unless the manufacturer approves the method. Natural stone tolerates neither acid nor aggressive blasting and should go to a professional who can select a soft media. Wet blasting is best for thick scale on durable tile; pressure washing is best for drained pools with moderate scale.
Stopping Criteria: When to Stop and When to Escalate
Stop and reassess if any of these happen:
- The tile surface starts to look dull, chalky, or etched even after rinsing.
- Grout lines begin to erode or sand away.
- You have applied descaler three times on the same patch with no visible reduction.
At that point, the cost of a mistake (replacing tile or regrouting) exceeds the cost of professional blasting.
Professional Pool Tile Cleaning: When to Call an Expert
DIY works for light scale you can reach from the deck. It stops working when the scale is thick, the tile is delicate, or the waterline ring wraps the whole pool.
DIY vs. Professional: The Real Tradeoffs
| Factor | DIY | Professional |
|---|---|---|
| Best for | Light scale, glazed ceramic, small areas | Thick scale, glass or natural stone, full waterline |
| Risk | Etched tile, burned skin, damaged grout | Low, if the contractor is insured and experienced |
| Recurrence | Same as professional unless water chemistry is fixed | Same as DIY unless water chemistry is fixed |
Neither DIY nor professional cleaning fixes the underlying cause. If your calcium hardness, pH, and alkalinity are out of range, scale returns in weeks either way.
What Professional Cleaning Actually Involves
A reputable pool tile cleaning company will typically:
- Test your water chemistry and note calcium hardness, pH, and alkalinity before starting.
- Identify the tile material and select a compatible method (chemical, media blasting, or both).
- Isolate the pool from runoff, usually by lowering the water level slightly or covering returns and skimmers.
- Apply descaler or perform wet blasting in sections, rinsing as they go.
- Neutralize any acid residue and restore water level.
- Re-test chemistry and advise on balancing.
Ask any contractor three questions before booking:
- What media or chemicals will you use, and are they safe for my tile type?
- Are you insured for tile and pool-shell damage?
- Will you re-test and advise on water balance after the job?
When Professional Service Is Warranted
Call a professional if any of these apply:
- Scale is thicker than about one-half inch.
- Deposits cover more than roughly a quarter of the waterline tile.
- Your tile is glass, travertine, limestone, marble, or another acid- or abrasion-sensitive material.
Cost and Time Expectations
Pricing varies widely by pool size and scale severity, so treat any number as a range, not a quote. Expect half a day for a typical residential pool, longer if the contractor has to drain or work around delicate stone.
Compare that to replacing etched tile or regrouting a waterline.
What to Do After the Cleaning
Professional cleaning resets the clock, it does not stop it. Within a week of service, test and balance:
- Calcium hardness: 200 to 400 ppm
- pH: 7.2 to 7.6
- Total alkalinity: 80 to 120 ppm
If calcium hardness is above 400 ppm, dilute by draining and refilling a portion of the pool, or use a sequestering agent per label directions. Without this step, scale returns regardless of who cleaned the tile.
Key Takeaway: Hire a professional when the tile is delicate, the scale is thick, or the waterline ring is extensive. Do the water-chemistry correction yourself afterward, or the same deposits will be back before the season ends.
Prevent Calcium Buildup Through Water Chemistry
Prevention is easier than removal. Balanced water chemistry stops calcium deposits from forming.
Monitor these water parameters:
- Calcium hardness: 200-400 ppm (parts per million)
- pH: 7.2-7.6
- Alkalinity: 80-120 ppm
High calcium hardness causes deposits. If your water tests above 400 ppm, calcium will build up fast.
Lower calcium hardness by diluting your pool water: drain 25%, refill with fresh water, and repeat if hardness stays high.
High pH (above 7.8) makes calcium more likely to precipitate out of solution.
Circulate your water constantly. Stagnant water allows minerals to settle and bond to tile.
Pro Tip: Test your water chemistry twice weekly during hot months. Evaporation concentrates minerals fast. Regular testing catches high calcium hardness before deposits form.
Common Mistakes to Avoid When Removing Calcium Deposits
Mistake 2: Mixing different cleaners Never mix acid with bleach or ammonia.
Mistake 5: Using acid on natural stone Acid damages marble, limestone, and other soft stones.
Mistake 6: Not wearing protective equipment Chemical burns are serious.
Mistake 7: Scrubbing too hard Aggressive scrubbing scratches tile. Use gentle, circular motions.
Calcium deposits are common in the California High Desert.
The real solution is water chemistry. Keep your calcium hardness, pH, and alkalinity balanced.
Frequently Asked Questions
What does calcium scale on pool tiles look like?
Calcium deposits appear as white, chalky, or crusty buildup along the waterline and on pool tile surfaces. The deposits feel gritty or rough to the touch and often form a ring around the tile where water level naturally sits. Unlike algae stains (which are green or black) or rust (which is orange or brown), calcium scale is typically white or off-white and does not wipe away easily with a cloth. Hard water conditions create thicker, more stubborn deposits over time.
Can I use vinegar or CLR to remove calcium from pool tiles?
Vinegar can work on light calcium deposits due to its acidity, but it is slower and less effective than commercial descalers or acidic pool cleaners. CLR and similar commercial products are stronger and faster, but they can damage certain tile finishes, grout, and pool equipment if not diluted properly and rinsed thoroughly. Always test any acidic cleaner on a hidden tile area first. Never use CLR directly in pool water, apply it only to tile above the waterline, wait 5-10 minutes, scrub, and rinse completely before the solution reaches the pool.
How do I remove calcium buildup without draining my pool?
Apply an acidic descaler or pool tile cleaner directly to deposits above the waterline, let it sit for 5-15 minutes depending on severity, then scrub with a soft brush and rinse thoroughly with fresh water. For deposits below the waterline, use a pool-safe acidic cleaner diluted in a spray bottle, apply it to the tile, scrub gently, and rinse immediately. Avoid letting acidic solutions drip into the pool; work in small sections and rinse each area completely before moving on. This method works for light to moderate buildup; heavy deposits may require wet blasting or professional removal.
When should I hire a professional to remove pool tile scale?
Hire a professional if deposits are extremely thick, cover large areas of tile, have damaged the tile surface, or if DIY methods have failed after multiple attempts. Professionals use wet blasting, specialized descalers, and equipment that safely removes heavy scale without harming the pool structure or water chemistry. They also assess whether the deposits indicate underlying water-balance problems that need correction. Professional removal is faster, safer for delicate tile finishes, and often includes prevention advice tailored to your water conditions.
Authoritative Reference
For additional guidance, see Pool & Hot Tub Alliance fact sheet: water balance and calcium carbonate scaling. The source supports general principles; specific service procedures should still follow the equipment manufacturer and local requirements.